Silhouette Cameo: "December" Handwritten Title

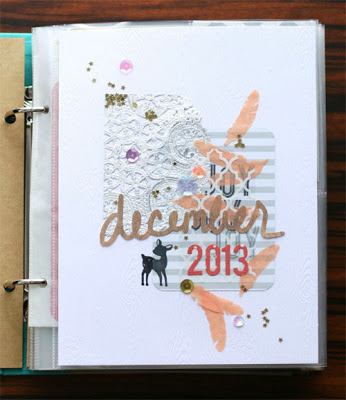
Hi there! How is everyone's December coming along? Today, I thought I'd share a bit about how I created the "December" handwritten die cut title in my

December Daily album

.

Anyone who has the 

Silhouette Cameo

 probably LOVES it just for this kind of application. I wanted my own handwriting to be captured in our December Daily, and the 

Silhouette Cameo

 is perfect for this.

Materials used:

See this

blog post

for details.

Here's a quick how-to:

  1. Write your word in script using a tablet and pen in Photoshop and save it as  JPG file. Or write your word using a black Sharpie marker on a white piece of cardstock and scan the word into a JPG file.
  2. Then open the file in your Silhouette Studio software.
  3. Trace the area where the word is. (Menu > Object > Trace > Select Trace Area and create a box around the area you want to trace)
  4. Play with the filters on the right side until you have a nice trace line around the word.
  5. Simple remove the JPG from the background and you'll have a nicely traced word you can cut with the Silhouette Cameo.

I love this technique when you're looking for a nice handwritten title for scrapbook pages or even sentiments on cards.

Thanks for stopping by!

- KRAFTY pearl

Etsy School: Paper & Scarf Marbling

Hi! I mentioned last month here, how I held a class for Etsy employees on cardmaking with watercolor and masking techniques. Since then, I've taken two other classes held by my talented colleagues.

Curious about Etsy School? Learn what they're all about here.

Today, I'd like to focus on a paper and scarf marbling class where I learned different marbling techniques and since have been drawn into an obsession of creating my own marble patterns. There are so many possibilities and I can't wait to try creating more patterns. I have plans of using these as mini scrapbook covers, Project Life cards, and greeting cards for my Etsy store.


How cool, huh? You can learn how to do this yourself too from the lovely Clare McGibbon. She has a great Etsy How-Tuesday post. It's an awesome how-to, so go ahead and check it out!

Thank you, Clare and Etsy, for supporting education amongst employees!

Thanks for stopping by!
- KRAFTY pearl

Personalize Your Wood Grain!

I totally love the look of faux bois! And it's often used in card making and scrapbooking. There are lots of papers and cardstocks out there that have really pretty wood grain pattern:
  1. My Little Shoebox's Woodsy paper
  2. Art Warehouse's Wood Embossed Great Outdoors paper
  3. Karen Foster's Wood Pattern paper
  4. Creative Imaginations Real Wood Veneer paper
But this past Valentine's I really wanted something personalized for my card. So instead, I decided to draw my own tree and wood grain:

blog 1 - valentines day card


Notice anything within the wood grain? Here's a closer look. Do you see it now? Embedded within the pattern, I wrote 'i love you' in script!

blog 2 - valentines day card detail


I loved the result so much, I decided to doodle another piece... 'i adore you' with 'you' centered in the heart:

blog 3 - faux bois i adore you


I also decided to put it in a shadow box as the main focal point but I could do so much more to it. (I bought a nice and simple Ribba shadow box from Ikea. Absolutely love these shadow boxes.) I could put a picture to the left of the heart. I could decorate it with more embellishments. The possibilities are endless.

What's great about drawing out your own wood grain pattern is that you can actually write camouflaged words or designs within the wood grain, really making the piece of art your own!

Here's a quick how-to:

I found the EK Success Zig Memory System Writer Dual Tip Pen Writer the most useful in drawing out my lines because of the sharp consistent point, though I also love doodling with Bic's Mark-It Permanent Markers Fine Point. But feel free to use whatever fine point pen you're most comfortable with controlling your lines.

First, start with your designs or words.

blog 4 - faux bois i adore you diy


Second, draw concentric lines around your designs and words leaving a fair amount of space between your lines. The lines doesn't have to be perfect because that's the beauty of wood grain patterns, they're not perfectly spaced.

blog 5 - faux bois i adore you diy


Third, continue to draw lines around your words or designs and let the imperfections guide you for a perfect faux bois doodle.

blog 6 - faux bois i adore you diy


And there you have it, a pretty piece of art personalized with your own message and design!

blog 7 - faux bois i adore you diy detail


So whaddaya think? Is it a cute personalized keepsake or what?

Until my next post!
- KRAFTY pearl

Before & After: Curtains & Grommets

One of my 2011 goals is to organize and maintain my craft tower. It's a Metro commercial shelving unit on casters from the Container Store that I customized for my craft storage needs. I love it because it's adjustable, sturdy and mobile. But it is somewhat industrial looking and as much as it is organized, it still stuck out like a sore thumb sitting in the middle of my living room. After some brainstorming, I decided to give it a softer, cozier look and cover the mess by adding curtains to it!

blog - before and after


I bought really cute teal printed Boodalee bed sheets that I found on Gilt Groupe a few months back. After some cutting, trimming and sewing, a single bed sheet was turned into two pieces of curtains. And with some finishing touches, I now have curtains to camouflage the tower.

Here's a quick how-to:

You'll need: fabric, grommet kit*, hammer, s-hooks**

blog - directions - 01

*Recommendation: Get the 'General' grommet tool kit that can be found at Home Depot. It comes with everything you need to set grommets along with the grommet pieces.

**Recommendation: Get the Lehigh s-hooks that can also be found at Home Depot. It has a nice deep hook that will keep the curtains on.


Set grommet with the backside of fabric up. Hammer in the lock using the grommet setter:
blog - directions - 02

Once locked, the hole is reinforced from tearing and the front side will look like this:
blog - directions - 03

Hook s-hooks onto craft unit:
blog - directions - 04

Hook fabric onto s-hooks:
blog - directions - 05

Voila! Finished curtains!
blog - curtains finished

That's it for now. Hopefully next time, I'll share some of my paper craft work!

Until the next post!
- KRAFTY pearl