Project Scrapbox Workbox: Installment #3

Hello! I decided to share my workspace, the Original Scrapbox Workbox, again. I just went through a big purge of unused supplies. As you've seen here and here, my craft area is teensy. So constant cleaning and organization is a must. The space is a real work in progress...


In an effort to take up less space, I've upgraded most of my full size stamp pads with Tsukineko Dew Drops, Clearsnap ColorBox Cat's Eye Queues, and SEI Ink Blocks. It's made such a difference and I love how I can quickly see all of the colors all in one small tin.


It's been a real struggle for me to find the right function behind my storage space since I always tend to have more than what can fit into the space. What are your tips to keeping an organized small craft space?

Thanks for stopping by!
- KRAFTY pearl

Project Scrapbox Workbox: Installment #2

I've been getting things back in order... both cleaning and organizing around the apartment.

Since I got the Scrapbox Workbox almost two years ago, I've had it neat, tidy, and closed for maybe a total of 5 days. It sits in the middle of my living room and since I'm constantly using this station, I've wanted to add a fabric panel to conceal my mess for quite some time.

But first, I actually had to clean my table top mess to even tackle sewing a fabric panel. Here's the whole transformation via Vine.


Materials used: Ikea fabric, Singer sewing machine, Velcro

Wait, this is Installment #2? Where's Installment #1? Here you go.

Thanks for stopping by!
- KRAFTY pearl

Project Scrapbox Workbox: Installment #1

Lots of changes this month... lots to be thankful for and lots to look forward to... On the work front, I said good bye to an old company and hello to a new company! I am so excited and I can't wait to jump right in. But the last few weeks have also been so busy wrapping things up and tying loose ends.

On the crafting front, I am excited to share that I made the investment in the Scrapbox Workbox. At first, I was hesitant because the box itself isn't necessarily my style with its traditional furniture look. But after further research, I was convinced it will meet all of my organizational and functional needs. And it did!

pearllui-scrapboxworkbox-organizing-20111019

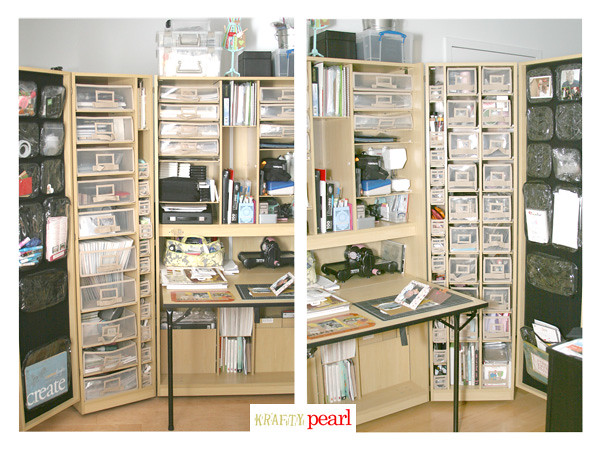
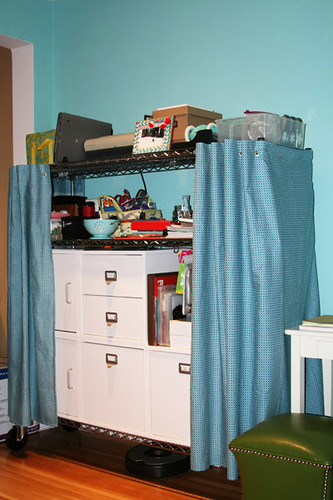
As you can see, it's still a somewhat unfinished workspace... meaning, I didn't complete all the organization of my craft stuff nor did I finalize the configuration of all the inside shelving. But the point of this post is just to share some things I learned through this huge investment. Installment #2 will be about the finished workspace and how I personalized it to inspire me each time I open the unit.

Research & Decision:

  • I wanted to purchase the unit with a discount, free shipping, and from a company with great customer care.
  • I finally bought it from Legacy Scrapbooking because I personally found the owners, Larry and Lynda, extremely responsive and helpful.
  • Plus, there was a 5% additional discount when you "LIKE" Legacy Scrapbooking on Facebook.
Timeline:
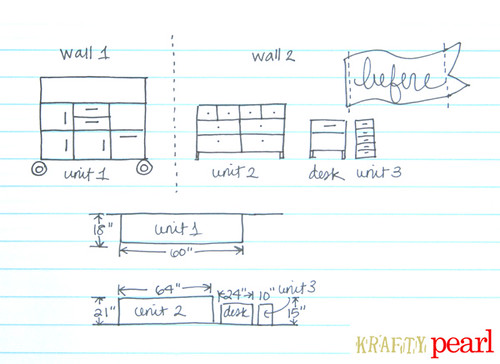
  • 9 days shipping from Utah to my New York apartment (amazing shipping time, if you ask me)
  • 0.5 hours moving and unwrapping the 5 boxes (total weight of 450 lbs.)
  • 5.5 hours building the unit (Thank you, love of my life!)
  • 3 hours configuring the inside shelving (still working on this)
  • Lifetime of craft organization at my fingertips! Love it!
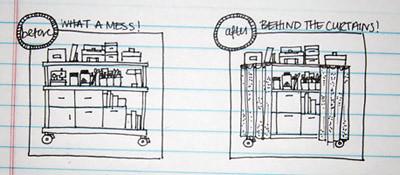
My 'Before' Studio:
  • I had two large craft units (one of them featured in this previous blog post), one small craft drawer, one small book shelf, and a small craft desk scattered around my living room, taking up way too much space.
  • But I loved the eclectic collected look of all the different units thrown together.

pearllui-scrapboxworkbox-drawingbefore-20111019


    My 'After' Studio:
    • I have one large craft unit that magically fits everything craft-related in a highly organized manner!
    • I will be personalizing it further so it feels more like my "studio" and less of just a huge display shelves.


    Next Steps:
    • Personalize the inside of the unit!
    • Come back and check out installment #2 on "Project Scrapbox Workbox"!
    Hope you found this post helpful if you're looking for information on the Scrapbox Workbox and let me know if you have any questions about it!

    Oh, and on a separate note, a great big thank you to Aussie Scrap Source for featuring one of my favorite layouts this past weekend. I used one of my absolute favorite punches on it, the Martha Stewart studded heart punch and now it is also on sale for 25% off at Two Peas!


    Thanks for stopping by!
    - KRAFTY pearl

    Before & After: Curtains & Grommets

    One of my 2011 goals is to organize and maintain my craft tower. It's a Metro commercial shelving unit on casters from the Container Store that I customized for my craft storage needs. I love it because it's adjustable, sturdy and mobile. But it is somewhat industrial looking and as much as it is organized, it still stuck out like a sore thumb sitting in the middle of my living room. After some brainstorming, I decided to give it a softer, cozier look and cover the mess by adding curtains to it!

    blog - before and after


    I bought really cute teal printed Boodalee bed sheets that I found on Gilt Groupe a few months back. After some cutting, trimming and sewing, a single bed sheet was turned into two pieces of curtains. And with some finishing touches, I now have curtains to camouflage the tower.

    Here's a quick how-to:

    You'll need: fabric, grommet kit*, hammer, s-hooks**

    blog - directions - 01

    *Recommendation: Get the 'General' grommet tool kit that can be found at Home Depot. It comes with everything you need to set grommets along with the grommet pieces.

    **Recommendation: Get the Lehigh s-hooks that can also be found at Home Depot. It has a nice deep hook that will keep the curtains on.


    Set grommet with the backside of fabric up. Hammer in the lock using the grommet setter:
    blog - directions - 02

    Once locked, the hole is reinforced from tearing and the front side will look like this:
    blog - directions - 03

    Hook s-hooks onto craft unit:
    blog - directions - 04

    Hook fabric onto s-hooks:
    blog - directions - 05

    Voila! Finished curtains!
    blog - curtains finished

    That's it for now. Hopefully next time, I'll share some of my paper craft work!

    Until the next post!
    - KRAFTY pearl