Getting Organized: Tape Holder Shelf

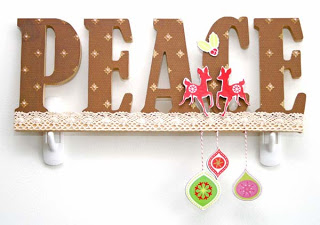
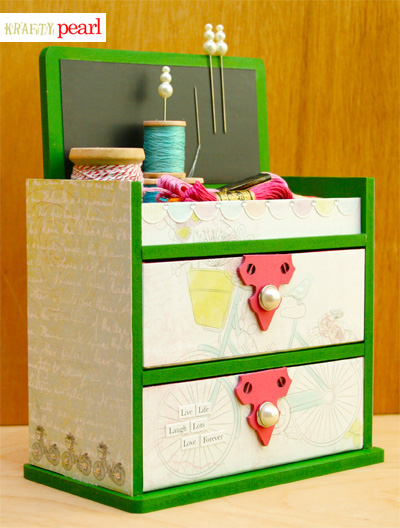
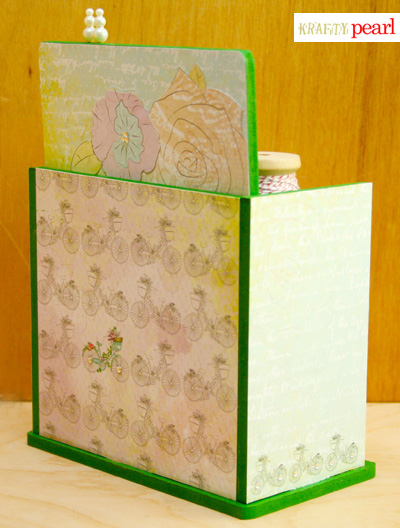
It's January, so it's time to get organized! I've accumulated a small collection of tape and I've been looking for a flexible system to store them. Here's what I made:


Materials Used: Kaisercraft Sweet Nothings You & Me, Acrylic Paint in Gold, Mini Drawers; Other: Mod Podge

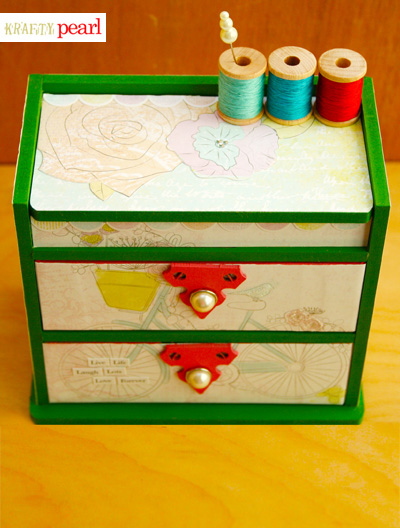
I love Kaisercraft's mini drawers because it's up to you with how you want to use it. Perhaps you have need for all the small compartments to hold beads or small findings. For me, the foundation shelf for the mini drawers was perfect to store all of my tapes. I love how it can stand horizontally like a bin or vertically like a shelf.

And it was so easy to make! I first painted the entire piece with gold acrylic paint. I then carefully adhered all of the paper to the shelf using Mod Podge. I then clipped a medium sized binder clip to hold my mini scissors which are perfect to snip tape. So simple and easy!

Thanks for stopping by!
- KRAFTY pearl

December 25th on September 20th

It's time to share some more holiday creations using the Kaisercraft December 25th collection.

I made a little "peace" sign holiday mobile mixing a bit of both the December 25th and Silly Season collections just to show that the two work great together. I covered each letter with “Noel” from the December 25th collection. To bring some of the Silly Season pink, I added pink pearls to the pattern. I then embellished further and created the ornament mobile arrangement with the Silly Season Printed Chipboard pieces.

Materials Used: Kaisercraft December 25th Noel (P718), Silly Season Printed Chipboard (CB133), Lace in Cream (EM927), Pearls in Pink Champagne (PL503); Other: Graphic Whiskers Twine

I then made a card. I love the vintage feel of the December 25th collection and it’s one of the reasons I’m so drawn to it. But I wanted to show the line in a more contemporary light by adding lots of white space and paper-piecing the window. The back side of “Festive” is a lovely white polka dot on green which gives the illusion of snow falling. Add a wreath, a couple layers of matting, and just like that, a simple and contemporary take on a vintage collection.


Materials Used: Kaisercraft December 25th Festive (P717), Wish (P719), Clear Stamp (CS790); Other: Copic Sketch markers, Memento ink pad

Hope you like what you see here and don't forget to visit the Kaisercraft blog for more inspiration!

Thanks for stopping by!
- KRAFTY pearl

Dressing Miss Nelly

Happy Monday!

One of my favorite Kaisercraft recent releases is the Large Mannequin! The dress form is gorgeous, especially paired with the Kaisercraft Miss Nelly collection.


I really wanted to highlight all the different pattern papers in the Miss Nelly collection - I love each pattern! So I cut strips of different pattern papers and adhered them to the back of the dressform. I also painted the dressform in a light spearmint color and embellished with red and white twine, clothespins and tags.

I had so much fun putting this project together!

Materials Used: Kaisercraft Large Mannequin (SB2123); Miss Nelly Her Dreams (P712), Her Style (P710), Her Eyes (P707), Canvas Tags (EM964), Rubon (RB934); Tag in Raw Kraft (EM925) and White (EM923); Acrylic Paint in Spearmint (KC044); Pearl Brads in Pearl (EM930); Other: clothes pins, Whisker Graphics twine, Martha Stewart punch

Thanks for stopping by!
- KRAFTY pearl

Aloha, Hunt & Gather!

Happy Monday!

As I go through some vacation photos, I find myself craving for my next adventure. I so need a vacation! But until then, this little project will have to hold me over. It is the Kaisercraft 6 frame photo display. I love these frames because they can be used for anything and everything.


This frame will remind me of the gorgeous Hawaiian skies... and bring some sense of serenity during the busy and hurried work week as I pass by it on my book shelf everyday.

I painted the frame in magenta, adhered photos and pattern papers from the Hunt & Gather paper pad and embellished it with diecuts from the back of the pad - love this about the paper pad! Added pearls as a frame, tiny alphabet stickers and painted chipboard letters as the title - Aloha.

Materials used: Kaisercraft Beyond the Page 6 Frame Photo Display; Kaisercraft Hunt & Gather Paper Pad (PP848); Acrylic Paint in Magenta (KC011); Mini Alpha Stickers in Cream (MA505); Pearls (PL506); Other: Mod Podge

Thanks for stopping by!
- KRAFTY pearl

Two Takes on Blae & Ivy

I really love the pretty Kaisercraft Blae & Ivy collection because it's so versatile.

Take 1: Elegant

The Kaisercraft Blae & Ivy has an elegant style to it in addition to its shappy-chic and romantic feel. It's perfect for an elegant thank you card!


Materials Used: Blae & Ivy Sky (P698), Mystic Cove (P697); BASICS Pearls in Snow; B/W Rub-ons Friends (RB891)

I stamped the image on white cardstock, cut and glue pennants to the cardstock in form of a banner, added pearls to tie the banner together, cut and glue a small strip of Mystic Cove pattern paper to the bottom right of the card and rubbed on the sentiment, "Thank You". I then matted the white cardstock to the Sky pattern paper and finally matted it to the white card base. So simple, yet fun and elegant!

___________________________

Take 2: Contemporary

As you may have noticed by now, I like punches of bright colors to give my projects a more contemporary look. That's exactly what I did with this frame by adding a striking hot pink color to contrast with the soft elegant Blae & Ivy colors.


Inspired by practically matching baby photos, I used the frame to compare my guy and I as toddlers and how we, at the time, haven't met yet.

Here's a more detailed look at the hearts. To create a clean collage feel, I "camouflaged" hearts in the backgrounds by punching hearts from the same pattern paper as the background, curling them and adhering in form of a banner and background texture.


Materials Used: Small Photo Display (SB2110); Blae & Ivy Meadow (P695), Mystic Cove (P697), Sky (P698), Mini Journal Tags (JT623), Sticker Sheet (SS106); Alpha Clear Stamps in Typewriter Font (CS785); Acrylic Paint in Hot Pink (KC1010), Pretty Pink (KC038); BASICS Pearls in Snow; Others: heart punch

So there you have it, two different takes on the same collection! And don't forget to continue to check out the Kaisercraft blog for more inspiration.

Thanks for stopping by!
- KRAFTY pearl

Little Toot: Great for Kids and More!

With airplanes, trucks and trains in bright primary colors, the Kaisercraft Little Toot collection is perfect for kids, especially little boys! But it's not just for kids! Today I'll show you two ways to use the collection!

Here, I made a clean and simple birthday card for little boys today.


Materials Used: Kaisercraft Little Toot Paper Pad (PP846) and Clear Stamps (CS780); Stickles; Memento in Tuxedo Black; Pentel white pen

I stamped the airplane image on two different pieces of pattern paper and cut the entire airplane out of one and cutting only the wings and tails from the second stamped image and glued them onto the first stamped and cut airplane image. Then I added some sparkle to the polka dots decorating the plane wings with glitter glue. Next, I cut (free-hand) a little cloud out of another piece of pattern paper and glued it to cardstock, then I layered the airplane above the cloud using 3-D foam adhesive. Next, I used an white opaque pen to doodle the skywriting "happy birthday". Lastly, I matted the card with another piece of pattern paper before matting it finally on the white cardstock base. It's as simple as that!
_______________________________

Next, I want to share the Train Frame decorated with the fun Little Toot collection. Like I said, although the Little Toot collection is perfect for kids, it's not just for little boys!

My parents went on an amazing trip to Peru, a trip they love so much that they can't stop talking about all the memorable moments, such as conquering the Machu Picchu hike and taking the Peru Rail, so I thought, why not make them a literal "conversation piece"!


Materials Used: Kaisercraft Train Frame (SB2113); Kaisercraft Little Toot Paper Pad (PP846), Clear Stamps (CS780); Kaisercraft Acrylic Paint in Deep Yellow (KC006); Layered Printed Chipboard (CB130); Mod Podge

What's great about Beyond The Page items is that they're alterable so you can personalize them in any way you wish. Here, there was no need for the second train cart, so I didn't use it! Instead, I let their gorgeous photos coupled with the Little Toot pattern papers speak for themselves.

I painted the pieces in yellow, adhered Putt and Bang pattern papers with Mod Podge, trimmed 5"x7" photos down to best highlight the perspective of the train in the photo and the peaks of Machu Picchu, and adhered the photos. I embellished the tip of the background peak with a Layered Printed Chipboard cloud and added some sparkle with glitter glue.

And just like that, my parents have a cute photo frame keepsake to remind them of their wonderful adventures in Peru! Hope you’re inspired to create your own Train Frame!

Check out what the rest of the Kaisercraft design team is up to on the blog!

Thanks for stopping by!
- KRAFTY pearl

Tickled Pink Gelato!

I am still tickled pink (gelato!) after last week's Kaisercraft announcement. So to start off this week, I'd like to share my Pink Gelato trinket box turned embroidery storage box. It is the other project for the final round of the Kaisercraft DT application.

When I saw the trinket box, I knew it would be perfect as my new embroidery storage box. The top compartment is used to store small tools, needles, and loose embroidery floss. The two drawers is used to store all of my embroidery floss and other loose threads, etc. The gorgeous bicycle design on the Vanilla pattern paper instantly reminded me of the New York Hampton’s where people would visit on holiday wearing cute Lilly Pulitzer shift dresses and bicycling around town.

pearllui-kaisercraft-trinketbox-frontstraightview-400blog

Used: Kaisercraft pattern papers; KaiserColour acrylic paint in green; Kaisercraft Locks & Hinges wood embellishments; Kaisercraft pearl brads; Me & My Big Ideas rhinestones; Mod Podge; Elmer’s wood glue; Glue dots; Magnet sheet; Bic Mark-it markers; Stickles

Here are some additional views:

pearllui-kaisercraft-trinketbox-frontsideview-400blog pearllui-kaisercraft-trinketbox-backsideview-400blog pearllui-kaisercraft-trinketbox-topview-400blog

  • One of my favorite tips for any MDF project: First, I put together the box (without any permanent adhesive) so I could see what the finished box looked like before decorating it. This allowed me to visualize the design on the finished piece. (For example, I wanted to fit the whole bicycle from the Vanilla pattern paper, so I was able to see that the whole bicycle scene could fit on the entire front surface of the box.) Then I just simply marked all the surfaces with a pencil indicating where I wanted to paint and where I wanted to affix Pink Gelato paper. The markings didn't show on the final project since they were covered with paint or paper.

  • To keep a clean MDF piece, I also recommend completing the painting first, before adhering paper. Since paint can drip, you want to let it all dry first.

  • One of my favorite parts of the box is the magnet sheet adhered to the underside of the cover. It's extremely useful in keeping needles and metal tidbits in place.
Thanks for stopping!
- KRAFTY pearl