Tickled Pink Gelato!

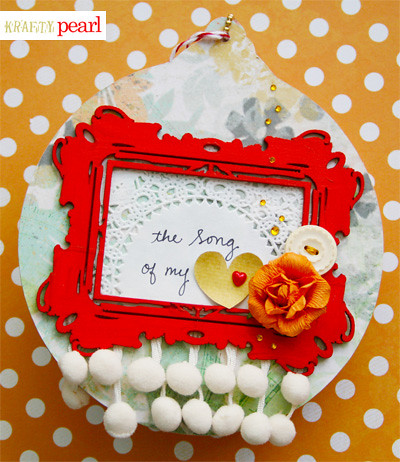
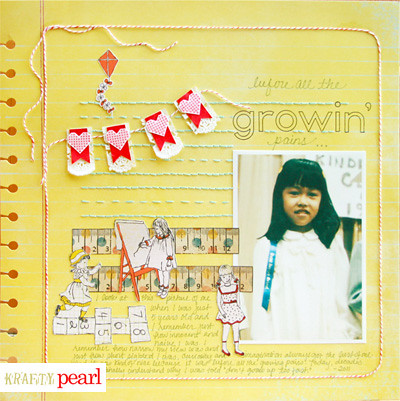
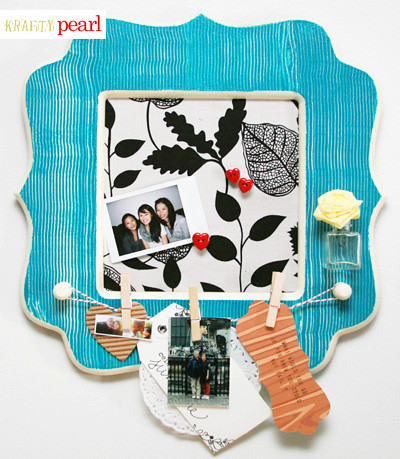
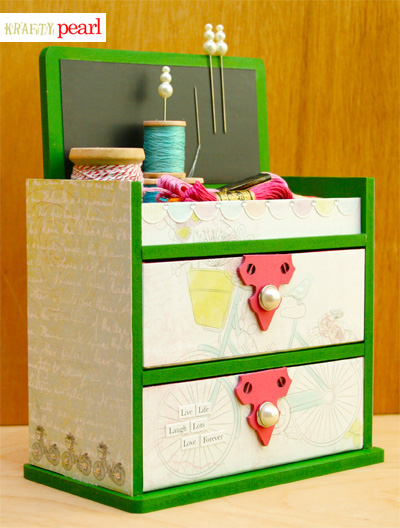
I am still tickled pink (gelato!) after last week's Kaisercraft announcement. So to start off this week, I'd like to share my Pink Gelato trinket box turned embroidery storage box. It is the other project for the final round of the Kaisercraft DT application.

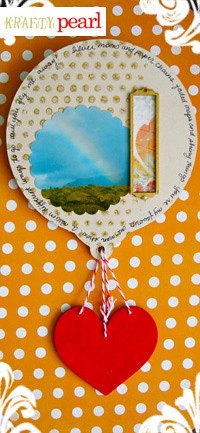
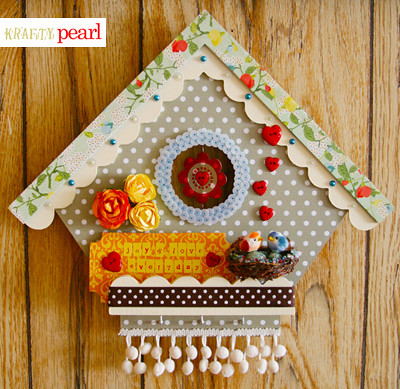
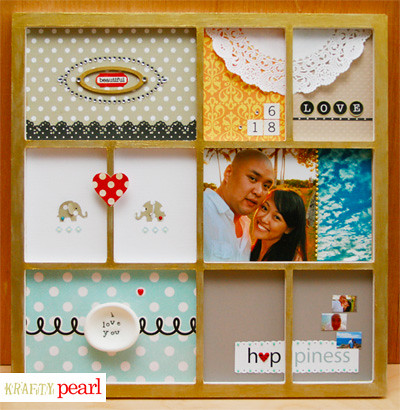
When I saw the trinket box, I knew it would be perfect as my new embroidery storage box. The top compartment is used to store small tools, needles, and loose embroidery floss. The two drawers is used to store all of my embroidery floss and other loose threads, etc. The gorgeous bicycle design on the Vanilla pattern paper instantly reminded me of the New York Hampton’s where people would visit on holiday wearing cute Lilly Pulitzer shift dresses and bicycling around town.

pearllui-kaisercraft-trinketbox-frontstraightview-400blog

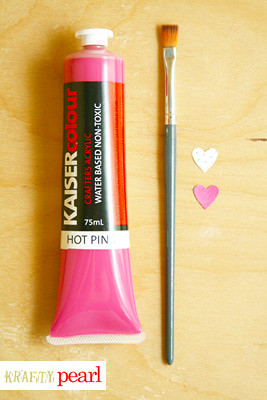
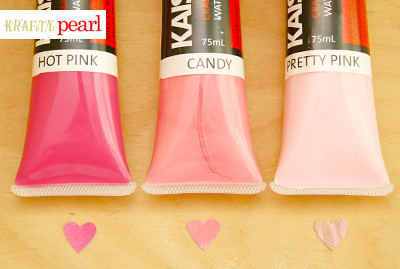
Used: Kaisercraft pattern papers; KaiserColour acrylic paint in green; Kaisercraft Locks & Hinges wood embellishments; Kaisercraft pearl brads; Me & My Big Ideas rhinestones; Mod Podge; Elmer’s wood glue; Glue dots; Magnet sheet; Bic Mark-it markers; Stickles

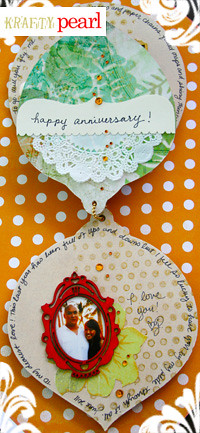
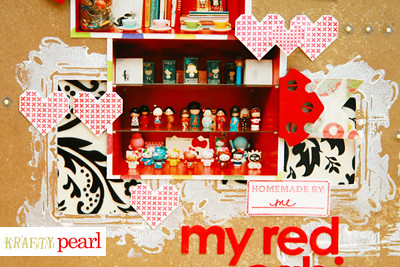
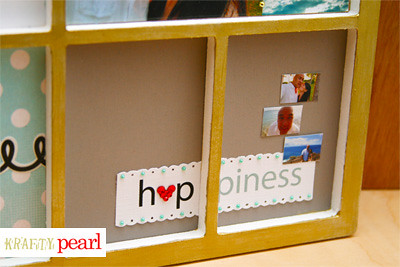
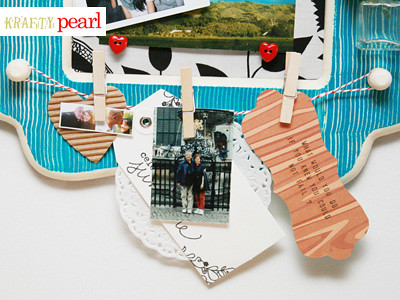
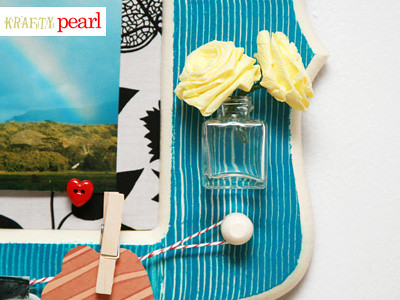
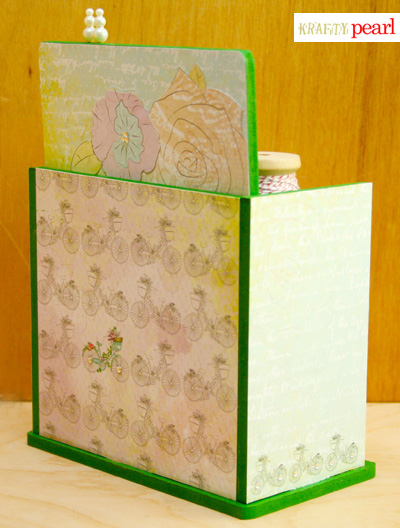
Here are some additional views:

pearllui-kaisercraft-trinketbox-frontsideview-400blog pearllui-kaisercraft-trinketbox-backsideview-400blog pearllui-kaisercraft-trinketbox-topview-400blog

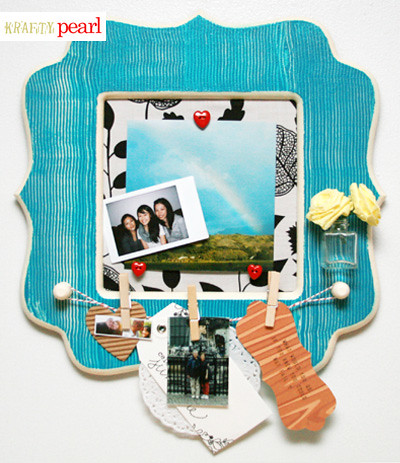
  • One of my favorite tips for any MDF project: First, I put together the box (without any permanent adhesive) so I could see what the finished box looked like before decorating it. This allowed me to visualize the design on the finished piece. (For example, I wanted to fit the whole bicycle from the Vanilla pattern paper, so I was able to see that the whole bicycle scene could fit on the entire front surface of the box.) Then I just simply marked all the surfaces with a pencil indicating where I wanted to paint and where I wanted to affix Pink Gelato paper. The markings didn't show on the final project since they were covered with paint or paper.

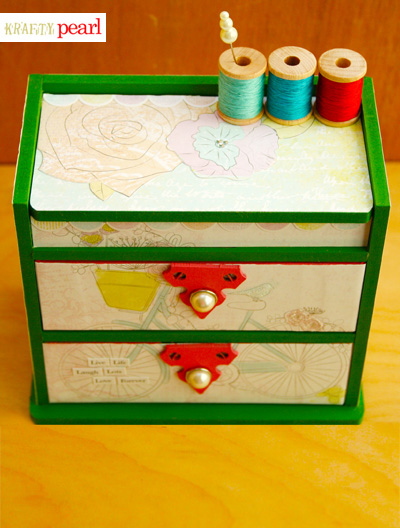
  • To keep a clean MDF piece, I also recommend completing the painting first, before adhering paper. Since paint can drip, you want to let it all dry first.

  • One of my favorite parts of the box is the magnet sheet adhered to the underside of the cover. It's extremely useful in keeping needles and metal tidbits in place.
Thanks for stopping!
- KRAFTY pearl

One Lucky Ducky!

Let me start this post off with a HOORAY!!! "Why", you ask? Well, I applied for this back in April.

And then I actually made it through to this in May.

And now... I am excited to share that I have made the 2011-2012 Kaisercraft design team! Being amongst the super talented 24 other finalists, my chances of getting a spot were slim. But it happened... Am I one lucky ducky or what!?

kaisercraftdesignteampost

Here is one of the finalist projects I submitted: Inspired by the lovely Velvet Ensemble collection and it's vintage feel, I was instantly reminded of precious black & white photos I have of my parents. It was perfect to showcase two of my favorite photos of my mom and dad before they became parents.

pearllui-73-kc-velvetensemble-400blog

Used: Kaisercraft pattern papers; KaiserColour acrylic paint in candy pink and gold; Kaisercraft Bubblegum Hills stamps; Kaisercraft Up, Up & Away stamp; Kaisercraft pearl brads; Paper Smooches “love” stamp; Jillibean number stickers; Nestabilities die set; EK Success border punch; Martha Stewart border punch; Glue dots; Memento black ink; Tombow permanent adhesive

A very HUGE thank you to the Kaisercraft team for the wonderful opportunity and I can hardly wait to begin my term! Congratulations to the new 2011-2012 Kaisercraft DT! I look forward to getting to know you and be inspired by you!

One last parting thought... something important I have learned from this is: if you want something, even if against all odds, just go for it!

I'll share my other finalist project in another post since I have long tips & techniques that go with it.

Thanks for stopping by and I hope you'll follow me through this incredible journey with Kaisercraft!

- KRAFTY pearl

Embody + Quick Acrylic Paint How-to

I love designing my own layouts, but I also really love playing with sketch challenges. I enjoy the challenge of making the sketch mine... incorporating my design style and interpreting it with my own twist.

For what I had in mind, I rotated the Kaisercraft May #1 Saturday Sketch by 90 degrees clockwise. Here's the rotated sketch:

kaisercraftsaturdaysketchmay1

Inspired by the Kaisercraft Saturday Sketch, super cute Paper Smooches Boob Tubes stamp set, and photos of my mom and I as complete mirror images when we were toddlers, I created this layout titled "embody". I love these pics of us because I embody all of her facial expressions and mannerisms. I am my mother's daughter. :)

pearllui-embody-full-400blog

Here's a closer look at the heart pennant banner:

pearllui-embody-detail-400blog

The hearts are one of my favorite parts about this layout. I love the varying shades of pink! If you're interested in making your own painted heart embellishments, here's a really simple tutorial.

You'll need: KaiserColour acrylic paint, Kaisercraft paint brush and punched pattern paper

pearllui-kaisercraftcolourheartstools-400blog

I love KaiserColour acrylic paints!

pearllui-kaisercraftcolourhearts-400blog
  1. Punch out hearts from different pattern papers
  2. Using a paint brush, lightly paint the hearts. Be light-handed so don't over-saturate the heart and cover the original pattern on the paper
  3. Let dry and affix to your layout!
Used: Kaisercraft pattern papers, Kaisercraft KaiserColour acrylic paints in Pretty Pink, Candy and Hot Pink, Paper Smooches Boob Tubes stamps, Close To My Heart alphabet stamps, EK Success heart Paper Shaper, Me & My Big Ideas rhinestone stickers, Wilton doily

This layout so happens to meet this week's Creating Keepsakes challenge to tell the story on one page. I'm all about single page layouts! :)

So whaddaya think?

Thanks for looking!
- KRAFTY pearl

Thanks for linking:

Will You Fly Me Away?

Can it really be May already? Time sure does fly! I created this mini album to wish my special guy a happy anniversary. Inspired by him of course... and by:
  • This super cute song by Annie Little and yes, a very cute Kindle ad. I've wanted to use this song in a project for the longest! The happy beat always puts a smile on my face.

  • The soft romantic colors of KaiserCraft's Lush collection. I especially love the patterns, cherry blossom and maple. I used KaiserCraft's KaiserColour acrylic paint in red to compliment the pretty aqua colors.

  • The lovely bauble shapes of the KaiserCraft bauble tag album. The round bauble reminded me of a hot air balloon and immediately triggered the "Fly Me Away" song in my head.

pearllui-minicover-400blog
Above: One of my favorite KaiserCraft products are the wood flourish embellishment frames. I painted it in a red that I echo in the rest of the mini album.


kaiserminialbum-spread0-400blog kaiserminialbum-spread1-400blog
Above: I designed the album so that as soon as the cover is flipped, the album looks like a hot air balloon. I really like that I can take apart the album to just show the cover bauble and heart and hang that as room decor. I painted all of the bauble tags with KaiserColour acrylic in antique white as the base color. I then stamped polka dots on the using KaiserColour acrylic paint in gold. Tip: Apply acrylic paint onto your rubberstamp with a wide flat paint brush to get an even layer of paint.


kaiserminialbum-spread2-400blog kaiserminialbum-spread3-400blog
Above: For this album, I wanted it to be a cross between card (with lots of handwritten elements) and a mini album (with pictures that follow our journey through this last year). I painted wood flourish embellishments with KaiserColour acrylic in red and gold with a rough flat brush to get in the grain.


kaiserminialbum-spread4-400blog kaiserminialbum-spread5-400blog
Above: Mod Podge is awesome to adhere pattern paper over the tags, even the acetate overlay! Although the acetate overlay is clear, an even coat of Mod Podge did the job, drying clear for a seamless attachment to the bauble tag. I hand-cut flowers from KaiserCraft pattern paper and adhered some more pom pom ribbon to add some softness to the mini album.

Used: KaiserCraft pattern papers, acetate overlay, wood flourish frames, blooms, KaiserColour in gold and antique white; Me & My Big Ideas bling; EK Success border punch; Michael's heart wood shape; Whisker Graphics twine; EK Success scallop circle and circle punch; Hero Arts polka dot background rubber stamp; M&J Trimming pom pom ribbon; Jenni Bowlin button; DMC embroidery floss; Bic Mark-it markers; Mod Podge; Glue dots

So whaddaya think?

Thanks for stopping by!
- KRAFTY pearl


Thanks for linking:
Get Your Craft On Tuesday
Tip Junkie handmade projects

Two KaiserCraft April Sketches, One Pencil Lines Sketch & a CK Spotlight! Oh My!

I have quite a few things to share today as you can tell from the title of this post... Here are three layouts and a really big thank you! Keep reading:

Layout 1: 'My Red Cabinet' | KaiserCraft April sketch #3

This past weekend, I saw the KaiserCraft's April sketch #3 and knew it was perfect to document the little nook of my apartment where I have my red cabinet of curiosities... ok, not really curiosities, but it's a cute, colorful collection of vinyl figures and pretty little things (including Hello Kitty, Momiji's & Harajuku Lovers perfumes) that make me smile. Curious visitors often spend quite some time staring at each and every single item on those shelves.

pearllui-myredcabinet-400blog


Used: KaiserCraft KaiserColour in white and red; KaiserCraft pattern papers, wood flourishes, acrylic stamps; My Little Shoebox alpha; Stabilo white pen; M&J Trimming sequins; Recollections pearl stickers; 3-D glue dots

Here's a detailed look:

pearllui-myredcabinet-detail-400blog

  • I absolutely love the super versatile KaiserCraft wood flourish embellishments. They come bare, ready to be painted, stamped, snapped, sanded, etc. I snapped the embellishment in half, sanded the rough parts and painted this embellishment with KaiserCraft acrylic paint in a matching shade of red to mimic my cabinet's hinges.

  • I also used the wood flourish frame as a stamp. Tip: Use any of the wood flourish embellishments as a stamp by painting it very roughly with KaiserCraft acrylic paint color of your choice and stamped directly on your page. It can get a bit messy, but use disposable gloves and your fingers will stay paint free!

  • One of my favorite techniques is cutting "windows" in my layouts. Here, I used my Fiskars finger tip knife to cut out the inside of two stamped frames and added a damask pattern KaiserCraft acetate sheet underneath.

  • I couldn't find the right shade of color for my title, so I painted over My Little Shoebox alpha stickers with KaiserCraft acrylic paint in a matching shade of red.

  • Using one of my favorite stamps from the super cute KaiserCraft Homemade acrylic stamp set, I stamped a bunch of embroidered hearts to complete the homemade look.


Layout 2: 'Cute Cups Obsessed' | Pencil Lines sketch #234

As you can tell, I have an obsession with all things cutesy! When it comes to cups, it's no different. Here is a layout about my favorite cups collected from the annual Target 2008-2011 releases for Valentine's. Inspired by Pencil Lines sketch #234 and with the help of super cute KaiserCraft stamps, I designed this layout to look like hanging cups in grandma's cute vintage kitchen.

pearllui-cutecups-400blog

Used: KaiserCraft pattern papers, stamps; Jillibean Soup alpha; My Little Shoebox alpha tab stickers; Stickles; 3-D glue dots

Here's a detailed look:

pearllui-cutecups-detail-400blog

  • The cup embellishments were created by stamping the polka dot cup image on pretty KaiserCraft pattern papers and cutting the outline with sharp craft scissors. To get in the tight handle area, I used my super sharp, trusty Fiskars fingertip knife.

  • I also used the cups in place of the letter 'u' in the title for a kitschy touch.

  • Stickles are one of my absolute favorite ways to decorate embellishments. The glittery polka dots helps each cup pop just a little bit.

  • Tip: Don't you hate it when you run out of alphabet stickers? I certainly do! But no worries! Just used the leftover negative portion, stick it on a piece of pattern paper and you've got yourself another letter. That's exactly what I did in here with the 's' in 'cups'.


Layout 3: 'Before All the Growin' Pains' | KaiserCraft April sketch #2

I have been going through some boxes of old pictures and I came across this one of me when I was 5 years old. I think I pretty much look the same as I do now... at least when it comes to my haircut. LOL Well that was before all the growin' pains that has created 'the me', I am today... 'the me' that's wearing fine lines and white hairs to show I've gone through lots of growing pains. With the help of this KaiserCraft April sketch #2, I created this layout to jot down my thoughts and reflections of 'the me' before all the growin' pains.

pearllui-growingpains-400blog


Used: KaiserCraft pattern papers, stamps; My Little Shoebox pattern paper; PaperTrey Ink outlines alpha stamps; Bic Mark-it markers; DMC embroidery floss; Whisker Graphics twine

Here's a detailed look:

pearllui-growingpains-details-400blog

  • I adore the notebook page shaped KaiserCraft Tuck Shop die-cut paper used as the base of this page. I wanted to highlight the paper itself by accentuating its light blue lines. I also wanted to keep an elementary school feel to the layout, so I decided to stitch penmanship practicing lines.

  • To create the banner, I layered a stamped heart over pattern paper and doily. The stamped hearts are once again from this super cute KaiserCraft Homemade acrylic stamp set

  • The title is handwritten and stamped. The handwritten portion was designed to look like pencil, but it's really the Bic Mark-it marker in grey. The stamped part of the title uses the super cute PaperTrey Ink outlines alphabet set. It is one of my favorite set of alpha stamps.

  • Lastly, I cut out a couple of figures from KaiserCraft pattern papers to create a mini collage to embellish the bottom left of the page.


And saving the absolute best news for last in today's post... drum roll... my latest KaiserCraft photo display project was spotted by CK and featured in this week's CK gallery scrapbooking inspiration! Someone pinch me!

pearllui-CKspotlight04252011


Thank you for picking my project, Ms. Megan Hoeppner, Creating Keepsakes' creative editor! *gasp*

Thanks for looking!
- KRAFTY pearl

Happy Birdies

I was once again inspired by the pair of mourning doves that started nesting on my window sill in March. Here I altered the KaiserCraft MDF birdhouse key holder with a nest, the birds, the eggs, paint, pretty pattern papers... the whole shebang!


pearllui-kaisercraftbirdhouse2-400blog

Used: KaiserCraft birdhouse; KaiserCraft KaiserColour acrylic paint in tropical water and antique white; KaiserCraft blooms; KaiserCraft acrylic stamps; KaiserCraft, Echo Park For The Record Fancy Foral pattern paper and Jillibean Soup Gruyere Cheese pattern paper; My Little Shoebox alpha stickers; Martha Stewart microbeads and glitter; Offray ribbon; Whisker Graphics twine; Mod Podge; glue dots; birds, eggs & nest from floral aisle of local Michael's; heart shaped buttons also from Michael's; M&J Trimming pom pom trimming and sequins; Recollections pearl stickers; beads left over from previous jewelry making days

For MDF painting tips, refer to this post! Here is a closer look at the other details:

To create the nest:

pearllui-kaisercraftbirdhouse2-detailnest400blog

  • I bought the birds, eggs, and nest from the floral aisle at Michael's. You can find them online as well.
  • The eggs were plastic and came speckled brown. Apply glitter with a coating of Mod Podge. Tip: Stick a toothpick in the egg at the end not visible in the nest before applying Mod Podge and glitter so your fingers stay sticky-free.
  • I wanted the nest to be decorated and appear a little dewy. So I applied Mod Podge to the nest, sprinkled some clear Martha Stewart microbeads and colorful beads to the rim of the nest. Tip: Mod Podge dries clear, so no worries if you've got a little too much of it as you're applying the beads. After all, you do want them to stick to the nest!
  • Stick birds, eggs, and nest to each other using glue dots or more Mod Podge.
To fill the birdhouse window:

pearllui-kaisercraftbirdhouse2-detailopening400blog

  • Stamp two identically shaped images on two pieces of pattern paper. The smaller images in this KaiserCraft stamp set perfectly fits into the opening!
  • Mod Podge the two together, aligning it back to back as mirror images with a 6" piece of twine centered between.
  • Continue to coat with a few more layers of Mod Podge and let it dry. It will harden and appear more like a dimensional charm.
  • Adhere the two ends of the twine to the back of the bird house and voila! You have yourself a cute little spinner charm!
  • To mimic the dotted pattern paper, I first painted the window frame in tropical water, then I layered sequins over the frame the teal color peek from the center of the sequins.
So, whaddaya think? Hope you likes!

Thanks for stopping by!
- KRAFTY pearl

Thanks for linking:
Get Your Craft On Tuesday
Tip Junkie handmade projects

More Than a Picture Frame

I totally love the KaiserCraft BTP line. Inspired by my guy, I created this keepsake for us with the KaiserCraft BTP MDF 9-frame photo display. This display frame is unlike the others because the back board and the frame comes in two separate pieces making it so easy to cut papers to fit in or to paint the openings! I like that their products are a blank slate and you can personalize it and make it your own however which way you wish! I also love the accompanying KaiserCraft KaiserColor acrylic paints that coat the MDF so well.

pearllui-kaisercraftbeautifullove-400blog

Used: KaiserCraft Beyond The Page 9-frame photo display; KaiserColour acrylic paint in gold, slate, white; KaiserCraft, Echo Park and Jillibean Soup pattern papers; Bazzill dotted Swiss cardstock; Martha Stewart and EK Success punches; Crayola air-dry clay; Bic Mark-it markers; Me & My Big Ideas and Heidi Swap rhinestones; Mod Podge (my trusty pal!), Recollections pearls; M&J Trimming sequins

About this project:
  • Painted the top in gold (KaiserCraft KaiserColour in gold) very light-handed with KaiserCraft fine flat brush. Applied about 3 coats for full coverage, allowing a couple of minutes drying time between each coat.

  • Painted the sides of the frame in white (KaiserCraft KaiserColour in white) with a KaiserCraft fine flat brush. Applied about 5 layers, letting a couple of minutes drying time between each coat.

  • Mod Podge is ALL over this project as an awesome adhesive and sealant for MDF.

  • Once all the paint and pieces were adhered exactly where I wanted it to appear, using the frame as an overlay guide, I used more Mod Podge to glue the frame to the back board. To keep the frame tightly adhered to the back board as its drying, cut small strips of wax paper and use medium sized binder clips to grip the corners and sides. The wax paper will keep the clips from leaving marks on your painted frame.

  • For long-winded MDF painting tips, refer to my last post!
Here's a more detailed look at what's going on starting top, across, and down each row!

Box 1: Painted KaiserCraft wood flourish label holder using a cheap chip brush to apply 3-4 coats of gold acrylic paint, letting each coat to dry a couple of minutes each. Cut a 6 1/4" x 1" piece of pattern paper and punch a border.
Used: Echo Park sticker, KaiserCraft wood flourish label holder, KaiserCraft KaiserColour acrylic paint in gold; Me & My Big Ideas and Heidi Swapp bling, KaiserCraft and Echo Park pattern paper, Martha Stewart punch

Box 2: Just cut paper in about 3 1/4" x 4 1/4" rectangles, and the frame will fill in the gaps.
Tip: Just cut doily in half. Because the Kaisercraft comes in two pieces, you can just put half a doily under the frame and glue the frame down. There's no need to cut the doily in fours to appear perfectly aligned in the box 2 and 3. I loved this display tray for this very reason!
Used: Jillibean Soup pattern paper, Echo Park number stickers, Me & My Big Ideas bling

Box 3: Cut polka dot paper into a thin strip to appear like a ribbon.
Used: Bazzill dotted Swiss cardstock, Echo Park letter stickers, Echo Park pattern paper

Box 4 and 5: To unify the two boxes and create a single scene, I Mod Podged a punched heart and glue dotted it to the frame. (It's ok to think outside of the frame!)
Used: Southworth fine linen paper, KaiserCraft and Echo Park pattern paper, Martha Stewart punches, Recollections pearls, Bic Mark-it markers, M&J Trimming sequins

Box 6: 4x6 photo split into two using Photoshop where 75% is my guy and I and 25% is of the gorgeous fluffy clouds of Hawaii.
Tip: By breaking up the photo in this ratio, it also visually broke up the repetitive frame. You can try other ratios if you want to create more "frames" without actual frames!

Box 7:

pearllui-kaisercraftbeautifullove-box7-400blog

This is one of my favorite 'technique' areas on the display. I was learning pottery when I first met my guy... so it was a part of our story. I really wanted to mimic the look of a ceramic piece without actually having to create a piece for the display for several reasons... no access to a kiln any more... the piece would be heavy and difficult to secure to the tray... And so, after some research I decided that I can very easily recreate the ceramic look with just simple non-toxic Crayola air-dry clay! It's light and fluffy... easy to knead and shape. Totally love it!
Used: KaiserCraft pattern paper, Echo Park sticker, Crayola air-dry clay

Box 8 and 9:

pearllui-kaisercraftbeautifullove-box89-400blog

Before adhering the frame to the back board, I painted these areas using KaiserColour in slate. Two coats of paint was plenty because it's a dark and opaque color. I then printed a meaningful term to us and adhered it directly to the paint. What is "hppiness"? I'll explain more when I discuss word art, so look forward to that post in a few weeks!
Tip: Painter's tape will help keep color where you want it, so don't paint without it!
Used: Me & My Big Ideas bling, Recollections pearls, EK Success punch, Southworth linen paper

This really is more than a picture frame and will be an everlasting keepsake. What do you think?

Thanks for stopping by!
- KRAFTY pearl

My New Teal Wood Grain Memo Board!

Lately, I've been playing around a lot with KaiserCraft goodies... extending myself "Beyond The Page" to make cute decorative pieces for my home. Their MDF products are perfect for it too! I've wanted a cute little memo board for my kitchen for the longest, but couldn't find one that truly fit my style. When I saw the KaiserCraft bracket frame, I knew it was perfect to create my own memo board... a teal wood grain memo board.

pearllui-kaisercraftmemoboard01-blog400

Used: KaiserCraft bracket frame, KaiserCraft KaiserColour in tropical water and antique white, Ikea fabric, Whisker Graphics baker's twine, Lara's Crafts dowel cap 1 1/8" (found at local Michael's, but can also be found here online), Lara's Crafts small clothespins (also found at local Michael's), Fishs Eddy's mini salt shaker, Mod Podge; miscellaneous: heart buttons, tacks, woodgrainer comb, paint comb, painter's tape

Displayed: Fuji Instax instant photo (love),
Jillibean corrugated heart
, My Little Shoebox woodsy pattern paper, American Crafts Lizzy celebrate sunshine stamp

I loved how it turned out and hope you do too! Here's how I made it and some tips & techniques.

Painting the frame:
  1. Apply 4-5 layers of your base color directly on the frame, letting each layer to dry for about 5-10 minutes each. Your base color should be the lighter color since light on top of dark won't "grain" as well as dark on light. Since I chose my wood grain pattern to be comprised of teal (KaiserColour in tropical water) and antique white (KaiserColour in antique white), antique white would be the base color. Tip 1: I suggest 4-5 layers for the base color because likely it is less opaque and will take more applications to saturate the whole surface. Tip 2: Also, since the surface is fairly smooth, using brushes would show brush marks. So instead, I picked up a handy Whizz touch up and trim kit from a local Lowes (it comes with 2" roller, tray and 2" high density foam roller cover) to apply the paint. It worked like a charm and NO brush strokes! Best part, you can actually reuse everything with a good rinse in warm water. After some usage, you'll just need to replace the foam roller cover.
  2. Seal the first color by applying 2 glossy Mod Podge layers and let dry overnight so that all previous layers harden. Tip: By using glossy Mod Podge, you create a slick layer so it's smoother as you push the second color later.
  3. Tape areas where you want to keep as the base color with painter's tape. I wanted the beveled inner and outer trims to remain antique white. Tip: To seal the rounded areas, just cut smaller pieces of tape to follow the curvature of the shape.
  4. Using a cheap chip brush, apply the second pattern color fully on the surface. While the color is still wet and glistening, use a woodgrainer or a comb to drag the wet paint and apply the wood pattern. Tip: Most woodgrainers are pretty large in width (because they're usually for large surfaces such as walls or furniture) and the surface of this frame is too small to fully optimize the pattern. So instead, I used a combination of paint comb drag and a toothpick! Yep, a simple tooth pick broken in half, taking the broken side drags paint just as well. I created a smaller eye in the upper right corner with this technique.
  5. Finally, seal one more time with a coat or two of Mod Podge.
Creating the clothespin line:

pearllui-kaisercraftmemoboard02-detail01-blog400

  1. Use two wooden dowel caps. You can also use thread spools or cute knobs. I painted the wooden dowel caps and adhered it to the frame using more Mod Podge. (Love that stuff!) Tip: If you decide to go with another wooden item to hold the ends of your clothesline, use a takeout chopstick and a large glue dot to hold the wooden item in place as you paint it so you don't get paint all over your fingers as you paint around it.
  2. Using a string of baker's twine, long enough to more than double the distance between the clothesline ends, tie a knot and then twist the twine until you get the desired tension and drop, then hang the ends on the "knobs". Tip: With this technique, you can change out the clothesline whenever you want a change! You can use jute, ribbon, embroidery floss... the possibilities are endless!
Other decorative elements:

pearllui-kaisercraftmemoboard02-detail02-blog400

  • Wrap fabric around a thick layer of foam to create the inner area for tacking. Tip: You can also use cork board squares, but I chose to use fabric over foam so that I can also easily slip sheets of paper (in this case, an Instax photo) to the side of the frame because the foam although is thick, has give that corkboard doesn't have.
  • Create button tacks by simply apply flat back buttons to flat top tacks.
  • I wanted the memo board to almost be like mini desk in the middle of my kitchen, so I added a mini "vase" to it. The "vase" is a mini salt shaker from one of my fave stores here in NYC, Fishs Eddy. To keep the clarity of the glass, I adhered it with Mod Podge. Tip: You can also add other "storage" elements to the frame, if you're not a flower person, by adhering a small tin box (to store a small sewing kit or matches) or another mini frame/bunch of mini frames instead (so you can interchange even more photos). How cute would these be running down the side of a memo board?
  • Do the flowers look familiar? They're crepe paper roses from my previous tutorial here.
I have to say I'm totally loving this frame because it's a memo board but it can also be a picture frame! I love functional and versatility! Currently, I'm using it more as a frame.

So what do you think?

pearllui-kaisercraftmemoboard02-blog400

And lastly but certainly not least, I wanted to thank Julie of Julie's Open Window for linking me as one of the 'new blogs you must see'! It's always so exciting to see support and encouragement from the craft community as a rookie blogger like myself!

Until the next post!
- KRAFTY pearl


Thanks for linking:
Get Your Craft On Tuesday
Tip Junkie handmade projects