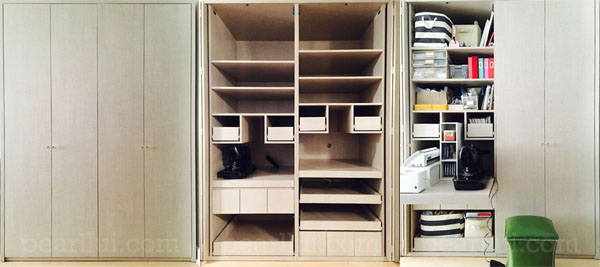
Designing a Small Space Custom Craft Closet

For years, I've assembled several pieces of furniture to make the perfect scrapbook and craft studio. That worked well in an apartment for one and that worked ok in an apartment for two. Space is much more limited with a baby and my craft furniture footprint took up too much room. Safety is also a constant concern. After much research and countless hours pinning dream studios, I finally invested in a built-in custom craft closet to house my studio.

Small Space Custom Craft Closet: Small Space Sewing and Crafting Space

Small Space Custom Craft Closet: Small Space Sewing and Crafting Space

Small Space Custom Craft Closet: Small Space Sewing and Crafting Space

Small Space Custom Craft Closet: Small Space Sewing and Crafting Space

I essentially designed a compact and efficient craft headquarter that would allow for all of my crafting tools and materials be stored in a 6 feet x 3 feet footprint hidden behind doors. A reasonable dining-table size footprint in a small apartment, designed with pull out drawers and work surfaces. The beauty is that everything can be easily tucked back in and out of sight when not in use. More importantly, little fingers won't be tempted! :)

More about the design process later this month!

I would be remiss if I didn't express my love for my nifty Scrapbox Workbox. It's been the home for all my crafting goodies for 4 good years.

What is your dream craft studio, maker space, or scrapbooking nook?

Minimizing Practically: The Wardrobe

As posted in January, I am learning to live minimally, in a way that works for my family. I am beginning with reorganizing, reducing, reusing, and recycling anything unnecessary. I want to do more with less and really only keep things I need and love, starting with one of my biggest problems, the wardrobe. Going from years of everyday traditional business setting to a business casual setting and now a casual setting, along with the changing pregnancy body last year, I accumulated too much clutter in my closet.

As part of my reduction process, I researched paring down to a minimalist closet. I came across so many great blogs that have been through this journey before. Here are a few guides that have inspired me to take action:

Be More with Less’ Project 333
Becoming Minimalist’s Practical Guide to Owning Fewer Clothes
Unfancy’s Capsule Wardrobe
House for Five’s

And this little gem I came across on Pinterest on how to organize your closet.

I purged more than half of my closet; selling some, donating a ton, and recycling a lot more. It felt great! I haven’t quite reached the 33, 37, or 30 piece closet but I’m experimenting and will continue to prune.

My goal is to get to 50 pieces total for an all year round wardrobe with all weather essentials, including shoes and outerwear, excluding home and gym clothes. Let’s see how that goes!

Setting Goals Made Easy with Goal Setting Worksheet

Last week, I blogged a bit about mind mapping. This week, I'm back with a free goal setting worksheet! I began the year looking for a goal setting worksheet and couldn't quite find one that met my needs. So I designed one and perhaps it will meet your needs too.

Designed by Pearl Lui: Free Download Goal Setting Worksheet for Action Planning and Successful Habit Building with Disc-Bound Margins

Designed by Pearl Lui: Free Download Goal Setting Worksheet for Action Planning and Successful Habit Building with Disc-Bound Margins

I wanted something that was rather simple in design with flexibility and not a ton of lines which I often find limiting my writing and drawing space. Channeling the spirit of high school biology workbooks, the worksheet was designed with a dashboard view and limitless flexibility. I'm sharing a watermarked version of this for free PDF download below.

Designed by Pearl Lui: Free Download Goal Setting Worksheet for Action Planning and Successful Habit Building with Disc-Bound Margins

Designed by Pearl Lui: Free Download Goal Setting Worksheet for Action Planning and Successful Habit Building with Disc-Bound Margins

  1. Subject/Date. The top of the worksheet has a gray bar for titling with a subject, theme, or name. There's also room for a date so you can record when you filled out the sheet.
  2. Goal/Why/Success Measurement.There's a big box for writing or drawing a goal! Next to it are two sections for you to write why the goal is important to you and what success looks like.
  3. Action Steps Checklist/Due Dates. In the left of the main middle section is an area for listing 5-7 action steps needed to meet the goal, a gray circle for checking off when a task is complete, and a place to write the date of when the action should be taken.
  4. Routine Building and Recurring Tasks Schedule. In the right of the main middle section are rows of light grey and white alternating perfect for creating a table of recurring tasks in a weekly or daily view. By having a clear view of the routine you need to bake in the day or week, allows you to build habits in a set schedule. To use for weekly recurring tasks, just use each row as a day as shown in the image below. To use for daily recurring tasks, just use gray and white rows together as needed to create your own table. See below for a daily schedule with AM, PM, and Night identified in the left column.
  5. Notes and Brainstorm. The bottom left section can be used for notes or brainstorming. There are no lines so you can make lists or draw in this area.
  6. Result/Learnings/Next Up. The bottom right section is a tracking area. Write down the result of your goal and what you learn. There's also an area for you to write down a next focus area based on learnings.
Designed by Pearl Lui: Free Download Goal Setting Worksheet for Action Planning and Successful Habit Building with Flexible Routine & Habits Section

Designed by Pearl Lui: Free Download Goal Setting Worksheet for Action Planning and Successful Habit Building with Flexible Routine & Habits Section

It's been helpful for all of the goals I've set up for myself this year. Let me know if this works for you and let me know if you run into any issues with the download below.

If you're interested in a watermark-free version of this worksheet, you can find it here in my Etsy shop, Pearl's Pen Pals.

Download Free Goal Setting Worksheet for Action Planning and Successful Habit Building designed by Pearl Lui

Designed by Pearl Lui: Free Download Goal Setting Worksheet for Action Planning and Successful Habit Building. For watermark-free version, visit pearllui.etsy.com.

Designed by Pearl Lui: Free Download Goal Setting Worksheet for Action Planning and Successful Habit Building. For watermark-free version, visit pearllui.etsy.com.

Mind Mapping to Stay Goals-Focused in 2015

Every new year, I write a long sectioned list of goals. I've done the same this year. But I'm also trying something new by mind mapping.

Mind Map: Routines focused on goals and how to achieve them.

Mind Map: Routines focused on goals and how to achieve them.

Mind mapping is a great way to see how all goals are related. It shows the bigger picture. Here's my process:

  1. Identify one main goal. By limiting to only one thing, you find what is most important to you this year. If there's only one thing to achieve this year, what would it be? Start your statement with a verb. Put this statement at the very center and heart of a blank page.
  2. Identify habits and objectives. If there are 5-10 only habits or objectives that will help you towards your main goal, what are they? Put these statements around the page and let each thought lead you to the next. Once you get to a natural stop, look at each statement and identify any gaps and write those down. By limiting yourself to 5-10, you again focus only on the things that are most important to you.
  3. Connect your habits and objectives to the goal. Identify the relationships in the habits and objectives so they become "workflows" or routines. Simply draw arrows to illustrate the connections.
  4. Create routines and build a mindset. Now that you have all of these dots connected, start filling them in with action.
  5. Hold yourself accountable. Remind yourself of how you want to live every day. Take action!

My mind map is centered around one main goal: Live a fuller life.

The relationship between my habits, objectives, and goals are clear.

  • Make great memories. This goal is purposely vague. Great memories apply to all parts of my life, whether it be to laugh with my family, dance with my God-children, travel with friends, or enjoy lunches with coworkers.
  • Take more photos. My list of crafting goals boils down to this one doable daily routine.
  • Minimize practically. I am learning to live minimally, in a way that works for my family. I am reorganizing, reducing, reusing, and recycling more than ever. The first thing is starting with the closets. I want to do more with less and really only keep things I need and love.
  • Spend less by reorganizing, reducing, reusing, and recycling.
  • Cook more. I want to continue practicing making meals regularly which will also help us spend less!
  • Be healthy. Eating out less and cooking more at home means consuming more nutritious foods.
  • Prioritize and build efficiency, to do more, live a fuller life, and make more great memories.
  • Craft and create. The decision-making process becomes easier by minimizing the number of choices, leaving me more time to fill my soul through creating, crafting, and learning.

I've already started some routines. The key now is consistency.

I look forward to holding myself accountable here. :)

Project Scrapbox Workbox: Installment #3

Hello! I decided to share my workspace, the Original Scrapbox Workbox, again. I just went through a big purge of unused supplies. As you've seen here and here, my craft area is teensy. So constant cleaning and organization is a must. The space is a real work in progress...


In an effort to take up less space, I've upgraded most of my full size stamp pads with Tsukineko Dew Drops, Clearsnap ColorBox Cat's Eye Queues, and SEI Ink Blocks. It's made such a difference and I love how I can quickly see all of the colors all in one small tin.


It's been a real struggle for me to find the right function behind my storage space since I always tend to have more than what can fit into the space. What are your tips to keeping an organized small craft space?

Thanks for stopping by!
- KRAFTY pearl

Project Scrapbox Workbox: Installment #2

I've been getting things back in order... both cleaning and organizing around the apartment.

Since I got the Scrapbox Workbox almost two years ago, I've had it neat, tidy, and closed for maybe a total of 5 days. It sits in the middle of my living room and since I'm constantly using this station, I've wanted to add a fabric panel to conceal my mess for quite some time.

But first, I actually had to clean my table top mess to even tackle sewing a fabric panel. Here's the whole transformation via Vine.


Materials used: Ikea fabric, Singer sewing machine, Velcro

Wait, this is Installment #2? Where's Installment #1? Here you go.

Thanks for stopping by!
- KRAFTY pearl

Getting Organized: Tape Holder Shelf

It's January, so it's time to get organized! I've accumulated a small collection of tape and I've been looking for a flexible system to store them. Here's what I made:


Materials Used: Kaisercraft Sweet Nothings You & Me, Acrylic Paint in Gold, Mini Drawers; Other: Mod Podge

I love Kaisercraft's mini drawers because it's up to you with how you want to use it. Perhaps you have need for all the small compartments to hold beads or small findings. For me, the foundation shelf for the mini drawers was perfect to store all of my tapes. I love how it can stand horizontally like a bin or vertically like a shelf.

And it was so easy to make! I first painted the entire piece with gold acrylic paint. I then carefully adhered all of the paper to the shelf using Mod Podge. I then clipped a medium sized binder clip to hold my mini scissors which are perfect to snip tape. So simple and easy!

Thanks for stopping by!
- KRAFTY pearl

Planning the New Year

Back again to show another project sure to help with organization. The best part about this project is that it's super easy and it will serve for an entire year!

pearllui-sei-dec-2012calendargift-600

Materials Used: SEI Spooks collection, Bazzill cardstock, Janome Sew Mini Sewing Machine

I created a fun and simple calendar that also serves as wall art and a picture frame. To create this calendar, I printed out the 2012 calendar, punched hearts of different sizes, cut a business card holder pocket and sewed them all to the page. I then finished it off with the 2012 stickers and slipped in a picture of my friend and I to personalize it. It's a simple enough of a project where you can even mass produce these to give to friends as a lovely handmade gift that helps them stay organized all year round too!

Hope you like this idea and be sure to check out the SEI blog for more inspiration!

Thanks for stopping by!
- KRAFTY pearl