A Kaisercraft Saturday Sketch Challenge!

Woohoo! It's Saturday! And it's time for another Kaisercraft Saturday Sketch challenge. Here's my take on the sketch:


Materials Used: Kaisercraft These Days Collectables and Collection
Other: Sewing machine, tissue paper

Kaisercraft's These Days collection is so beautiful, soft, and romantic. I especially love how versatile the These Days Collectables die-cuts are and they're perfect to use in this sketch challenge. I created a layout about why I love Etsy and used collateral I've collected from their fairs and combined them with die-cuts and tissue paper hearts to re-create a layout based on the sketch. I really enjoy working with sketches because I love a good challenge. This one was definitely challenging because the sketch calls for a lot of embellishments. Given that my style is a little more minimalistic, I dialed down the embellishments to still match the sketch but stay true to my design style. I hope you'll enjoy playing with this sketch too regardless of your design style! Visit the Kaisercraft blog to play along.

The layout is based on this Kaisercraft Saturday Sketch Challenge sketch:


Thanks for stopping by!
- KRAFTY pearl

Love To Travel

Happy Saturday! There are only a few more weekends of summer and I plan to savor each one... So I'm just hopping on quickly to share Kaisercraft's August Saturday Sketch #2 using the recently released, Hunt & Gather collection.


And here's my interpretation of it, tilted 90 degrees counter-clockwise to better incorporate the technique and layout I had in mind.


  • To create the frame around the photo, journaling label and corrugated tag cluster, I used a craft knife to cut around the pattern of the paper.
  • I used the wood grain banner sticker that came with the Hunt & Gather sticker sheet – I love it!
  • I added some rhinestones and hearts randomly on the pennants to enhance the wood grain pattern.
  • To give the leafy vine sticker a slightly more turquoise tone and dewy look, I lightly brushed on spearmint acrylic paint around the edges of the leaves and added some clusters of rhinestones to it.

Materials Used:
Kaisercraft Hunt & Gather Listen (P705), Sticker Sheet (SS107), Corrugated Cardboard Tags (EM963), Paper Pad (PP848); Rhinestone (RS402); Kaisercraft KaiserColour Acrylic Paint in Spearmint (KC044); Other: Fiskars fingertip craft knife

Hope you like my interpretation and don't forget to stop by the Kaisercraft blog to see the August Saturday Sketch #1 and more inspiration from the design team!

Thanks for stopping by!
- KRAFTY pearl

Embody + Quick Acrylic Paint How-to

I love designing my own layouts, but I also really love playing with sketch challenges. I enjoy the challenge of making the sketch mine... incorporating my design style and interpreting it with my own twist.

For what I had in mind, I rotated the Kaisercraft May #1 Saturday Sketch by 90 degrees clockwise. Here's the rotated sketch:

kaisercraftsaturdaysketchmay1

Inspired by the Kaisercraft Saturday Sketch, super cute Paper Smooches Boob Tubes stamp set, and photos of my mom and I as complete mirror images when we were toddlers, I created this layout titled "embody". I love these pics of us because I embody all of her facial expressions and mannerisms. I am my mother's daughter. :)

pearllui-embody-full-400blog

Here's a closer look at the heart pennant banner:

pearllui-embody-detail-400blog

The hearts are one of my favorite parts about this layout. I love the varying shades of pink! If you're interested in making your own painted heart embellishments, here's a really simple tutorial.

You'll need: KaiserColour acrylic paint, Kaisercraft paint brush and punched pattern paper

pearllui-kaisercraftcolourheartstools-400blog

I love KaiserColour acrylic paints!

pearllui-kaisercraftcolourhearts-400blog
  1. Punch out hearts from different pattern papers
  2. Using a paint brush, lightly paint the hearts. Be light-handed so don't over-saturate the heart and cover the original pattern on the paper
  3. Let dry and affix to your layout!
Used: Kaisercraft pattern papers, Kaisercraft KaiserColour acrylic paints in Pretty Pink, Candy and Hot Pink, Paper Smooches Boob Tubes stamps, Close To My Heart alphabet stamps, EK Success heart Paper Shaper, Me & My Big Ideas rhinestone stickers, Wilton doily

This layout so happens to meet this week's Creating Keepsakes challenge to tell the story on one page. I'm all about single page layouts! :)

So whaddaya think?

Thanks for looking!
- KRAFTY pearl

Thanks for linking:

Crazy for Kaisercraft!

As you can see from my previous posts, I've shared several Kaisercraft projects in back-to-back posts. I'm crazy for Kaisercraft! In addition to the fact that I absolutely LOVE Kaisercraft products, it's also because I decided last month to begin a journey... feverishly working on projects for their 2011-2012 design team call!

I can ecstatically report that I have made it to the final round! See all 25 finalists here. I am so thrilled and honored to be in such great company! I still have a long way to go with the final projects, but a big big big thank you to Kaisercraft for putting me through to round 2!

krafty pearl - kaisercraft 2011 dt 25 finalist

And as if that wasn't exciting enough... "My Red Cabinet" from my 4/26 post is the Kaisercraft April sketch winning layout! Thank you so much, Kaisercraft!

krafty pearl - kaisercraft april sketch winner

Last but not least, I wish all moms out there a very happy early mother's day! My mum is my craft idol. She is a watercolorist, an oil painter, a knitter, a crocheter, and an apparel designer/maker. She does it all!

Here's a card I made for my mum using all Kaisercraft products. One of the reasons I find Kaisercraft products so inspiring is because of the lovely variety and the incredible versatility. They have bright, fun and whimsical patterns but then they also have soft, romantic, vintage designs. I went for the soft, romantic look for my mum's card using this gorgeous flock accent pattern paper. Loves it!

krafty pearl - happy mother's day!

Used: Kaisercraft pattern papers and acetate overlay, Kaisercraft Kaisercolour acrylic paint in pretty pink, Kaisercraft flourish embellishment frame, Heidi Swapp bling, and Sizzix die

Thanks for looking and stopping by!
- KRAFTY pearl

Two KaiserCraft April Sketches, One Pencil Lines Sketch & a CK Spotlight! Oh My!

I have quite a few things to share today as you can tell from the title of this post... Here are three layouts and a really big thank you! Keep reading:

Layout 1: 'My Red Cabinet' | KaiserCraft April sketch #3

This past weekend, I saw the KaiserCraft's April sketch #3 and knew it was perfect to document the little nook of my apartment where I have my red cabinet of curiosities... ok, not really curiosities, but it's a cute, colorful collection of vinyl figures and pretty little things (including Hello Kitty, Momiji's & Harajuku Lovers perfumes) that make me smile. Curious visitors often spend quite some time staring at each and every single item on those shelves.

pearllui-myredcabinet-400blog


Used: KaiserCraft KaiserColour in white and red; KaiserCraft pattern papers, wood flourishes, acrylic stamps; My Little Shoebox alpha; Stabilo white pen; M&J Trimming sequins; Recollections pearl stickers; 3-D glue dots

Here's a detailed look:

pearllui-myredcabinet-detail-400blog

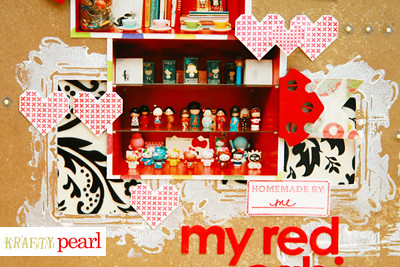
  • I absolutely love the super versatile KaiserCraft wood flourish embellishments. They come bare, ready to be painted, stamped, snapped, sanded, etc. I snapped the embellishment in half, sanded the rough parts and painted this embellishment with KaiserCraft acrylic paint in a matching shade of red to mimic my cabinet's hinges.

  • I also used the wood flourish frame as a stamp. Tip: Use any of the wood flourish embellishments as a stamp by painting it very roughly with KaiserCraft acrylic paint color of your choice and stamped directly on your page. It can get a bit messy, but use disposable gloves and your fingers will stay paint free!

  • One of my favorite techniques is cutting "windows" in my layouts. Here, I used my Fiskars finger tip knife to cut out the inside of two stamped frames and added a damask pattern KaiserCraft acetate sheet underneath.

  • I couldn't find the right shade of color for my title, so I painted over My Little Shoebox alpha stickers with KaiserCraft acrylic paint in a matching shade of red.

  • Using one of my favorite stamps from the super cute KaiserCraft Homemade acrylic stamp set, I stamped a bunch of embroidered hearts to complete the homemade look.


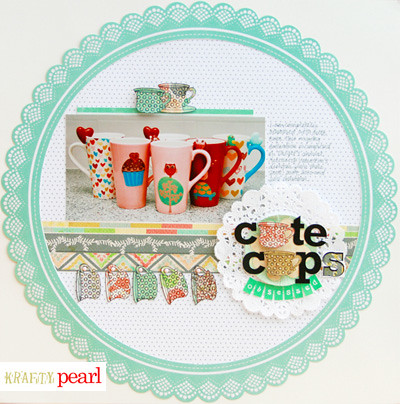
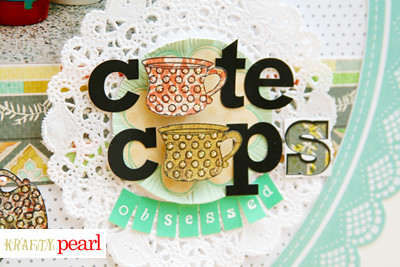
Layout 2: 'Cute Cups Obsessed' | Pencil Lines sketch #234

As you can tell, I have an obsession with all things cutesy! When it comes to cups, it's no different. Here is a layout about my favorite cups collected from the annual Target 2008-2011 releases for Valentine's. Inspired by Pencil Lines sketch #234 and with the help of super cute KaiserCraft stamps, I designed this layout to look like hanging cups in grandma's cute vintage kitchen.

pearllui-cutecups-400blog

Used: KaiserCraft pattern papers, stamps; Jillibean Soup alpha; My Little Shoebox alpha tab stickers; Stickles; 3-D glue dots

Here's a detailed look:

pearllui-cutecups-detail-400blog

  • The cup embellishments were created by stamping the polka dot cup image on pretty KaiserCraft pattern papers and cutting the outline with sharp craft scissors. To get in the tight handle area, I used my super sharp, trusty Fiskars fingertip knife.

  • I also used the cups in place of the letter 'u' in the title for a kitschy touch.

  • Stickles are one of my absolute favorite ways to decorate embellishments. The glittery polka dots helps each cup pop just a little bit.

  • Tip: Don't you hate it when you run out of alphabet stickers? I certainly do! But no worries! Just used the leftover negative portion, stick it on a piece of pattern paper and you've got yourself another letter. That's exactly what I did in here with the 's' in 'cups'.


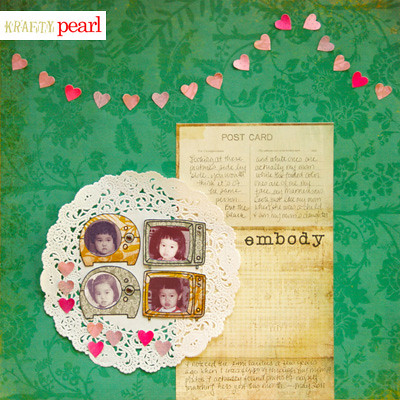
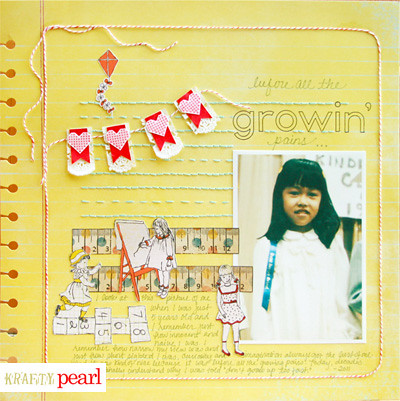
Layout 3: 'Before All the Growin' Pains' | KaiserCraft April sketch #2

I have been going through some boxes of old pictures and I came across this one of me when I was 5 years old. I think I pretty much look the same as I do now... at least when it comes to my haircut. LOL Well that was before all the growin' pains that has created 'the me', I am today... 'the me' that's wearing fine lines and white hairs to show I've gone through lots of growing pains. With the help of this KaiserCraft April sketch #2, I created this layout to jot down my thoughts and reflections of 'the me' before all the growin' pains.

pearllui-growingpains-400blog


Used: KaiserCraft pattern papers, stamps; My Little Shoebox pattern paper; PaperTrey Ink outlines alpha stamps; Bic Mark-it markers; DMC embroidery floss; Whisker Graphics twine

Here's a detailed look:

pearllui-growingpains-details-400blog

  • I adore the notebook page shaped KaiserCraft Tuck Shop die-cut paper used as the base of this page. I wanted to highlight the paper itself by accentuating its light blue lines. I also wanted to keep an elementary school feel to the layout, so I decided to stitch penmanship practicing lines.

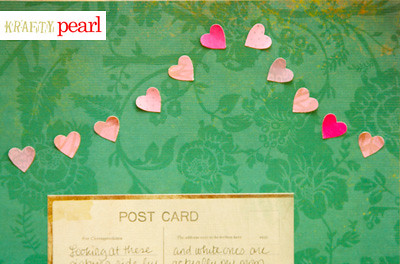
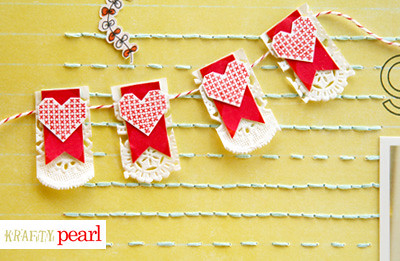
  • To create the banner, I layered a stamped heart over pattern paper and doily. The stamped hearts are once again from this super cute KaiserCraft Homemade acrylic stamp set

  • The title is handwritten and stamped. The handwritten portion was designed to look like pencil, but it's really the Bic Mark-it marker in grey. The stamped part of the title uses the super cute PaperTrey Ink outlines alphabet set. It is one of my favorite set of alpha stamps.

  • Lastly, I cut out a couple of figures from KaiserCraft pattern papers to create a mini collage to embellish the bottom left of the page.


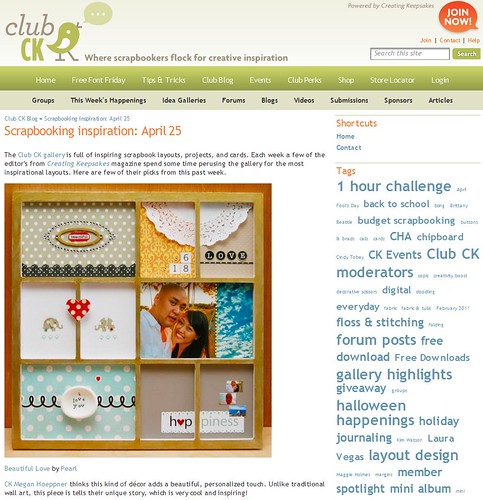
And saving the absolute best news for last in today's post... drum roll... my latest KaiserCraft photo display project was spotted by CK and featured in this week's CK gallery scrapbooking inspiration! Someone pinch me!

pearllui-CKspotlight04252011


Thank you for picking my project, Ms. Megan Hoeppner, Creating Keepsakes' creative editor! *gasp*

Thanks for looking!
- KRAFTY pearl